Blog Tagline

Blog Tagline
Showing posts with label free pattern. Show all posts

12/31/14

Jolly Amigurumi Santa Poo


If you thought I'd get through the rest of 2014 without posting about another piece of crocheted crap, I am delighted to tell you that YOU WERE WRONG.  Obviously the best way to close out the year is with a holiday version of my favorite amigurumi!

Jolly Amigurumi Santa Poo is now the fourth rendition of the Jolly Amigurumi Poo (you can read about the original here and the European versions here).  I used the exact same pattern as the original, with the obvious difference being the addition of his wee Santa hat.  I figured I'd have a hard time finding a pattern for a perfectly-poo-sized hat, so I made one up.  If you need to crochet a Santa hat for a Jolly Poo or another small amigurumi (the hat is a little over 2.5 inches tall with the pom pom), here's my pattern:

Size F Crochet Hook (I used Red Heart worsted weight acrylic yarn)
In red:
6 SC in Magic Circle
R1: SC around (6)
R2: (Inc + 1 SC) x 3 (9)
R3: SC around (9)
R4: SC around (9)
R5: (Inc + 2 SC) x 4 (12)
R6: SC around (12)
R7: SC around (12)
R8: (Inc + 2 SC) x 4 (16)
R8: SC around (16)
R9: SC around (16)
Switch to white:
R10: (Inc + 1 SC) x 8 (24)
Slip stitch to close and fasten off, leaving a long tail for sewing.

I made the pom pom at the top of the hat using a fork and then just gave it an extreme haircut to make it really small.  Here's a good picture tutorial on fork pom poms (it also shows how to make monstrous pom poms using toilet paper rolls, if that's your thing.)  Make sure to leave a long tail on the pom pom when you tie it off so that you can use it to sew the pom pom to the tip of the hat's cone.

Once the hat is done, pin it to the Jolly Poo in a place you like, then sew it on.  In addition to looking festive on your coffee table or on your bathroom counter, Jolly Amigurumi Santa Poo also makes a cute, albeit ridiculous, ornament- just stick a hook into the tip of his poo head and hang him from your tree.  Make him now and stow him away with your ornaments as you take them down this week- that way you'll be pleasantly surprised (and/or disgusted) when you unpack your decorations for Christmas 2015.


Congratulations, you now possess the most festive feces in the land!

11/3/14

Halloween Crochet: Amigurumi Candy Corn!


 After a rather long blogging (and crocheting!) hiatus, I have returned just in time for everybody’s favorite crochet season- autumn and Christmas.  This year I celebrated Halloween by trick or treating with one of my favorite 1-year-olds, so I knew I wanted to make her something cute for the occasion.  During one of my many Ravelry browsing sessions, I came across the free, squeal-inducingly cute Candy Corn pattern from Josephine Wu (you'll also recognize her as the designer of the Amigurumi Panda I blogged about).  The link requires you to log in to Ravelry to see the pattern.  Make an account if you don't already have one- it's free and the absolute best source for crochet and knitting patterns on the Interwebs.  But back to the candy corn- this wee fellow is the perfect size to fit in a toddler palm and I already had the right yarn colors in my hoard, so crochet him I did.

I used Red Heart worsted weight acrylic yarn, which, despite being on the scratchy side for projects like blankies and scarves, is perfect for amigurumi (with the added bonus of being cheap and available everywhere).  The stiffness of the acrylic yarn helps the amigurumi carcasses to hold their shape before they are stuffed, and the yarn plies (plyes? Is this a word?) are pretty good about not splitting even with the little size F crochet hook this project calls for.  A lot of crocheters prefer 100% cotton yarn for amigurumi projects since it tends to fuzz less, but that stuff kills my fingers and I actually prefer the slightly fuzzy finished look of acrylic.


Isn't he cute?  My friends' daughter Emma seemed to like him well enough, so I am satisfied.  We had a grand time taking our kids trick or treating around our local neighborhood (and by "our" kid I am referring to Gareas.  He was a slightly unhappy blue crayon).  I was unfortunately reminded of how much I despise middle school-aged children as they ran amok in the streets without their parents to keep them from acting a fool, but alas, these situations cannot always be avoided.


Now that Halloween is out of the way, I am looking forward to tackling an (over)ambitious amount of crochet projects for winter and Christmas.  Expect to see more posts than you have been lately!

4/21/14

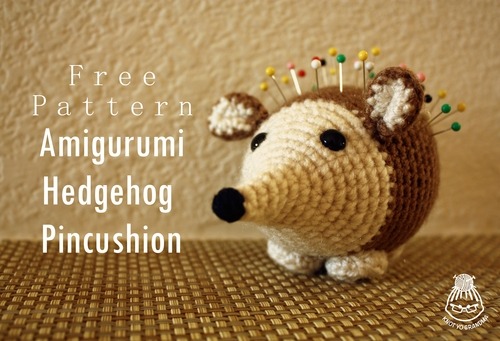
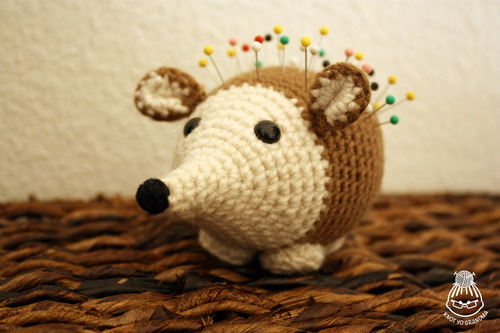
Amigurumi Hedgehog Pincushion Pattern

Never again suffer the indignity of a jab in the hindquarters from a wayward pin!


image


Materials
Acrylic worsted weight yarn in two shades of brown (one light, one dark)
Size F crochet hook
Size E crochet hook
2 9mm safety eyes
Yarn needle
Black embroidery thread
Embroidery needle
Poly-Fil stuffing (or equivalent)


Things to Know


This is an original pattern by Robyn of Knot Yo Grandma. It has been provided at no charge and cannot be sold or redistributed. Please do not claim this pattern as your own. When referencing this pattern, please link back to this post.


This pattern is worked entirely in the round with single crochet stitches using increases and decreases.  Do not join rounds—continue working in a spiral. Use a stitch marker to mark the last stitch of each row. The number in parenthesis at the end of each line in the pattern represents the number of completed stitches in each round. 


CH= Chain
SC= US Single Crochet (UK Double Crochet)
SC BLO= Single Crochet in back loops only
Inc=Increase (2 stitches in 1 stitch)
Dec=Decrease
st= Stitch(es)
rep= follow instructions within *stars* this many times in a single round


Body Pattern


Begin with light brown yarn, use size F hook.


Begin with 3 SC into Magic Circle (3)
R1: Inc in next SC, SC in next 2 SC (4)
R2: *Inc, SC in next st* rep x 2 (6)
R3: *Inc, SC in next st* rep x 3 (9)
R4: SC in each st around (9)
R5: SC in each st around (9)
R6: *Inc, SC in next 2 st* rep x 3 (12)
R7: *Inc, SC in next 3 st* rep x 3 (15)
R8: *Inc, SC in next 4 st* rep x 3 (18)
R9: *Inc, SC in next 5 st* rep x 3 (21)
R10: *Inc, SC in next 6 st* rep x 3 (24)
R11: *Inc, SC in next 7 st* rep x 3 (27)
R12: *Inc, SC in next 8 st* rep x 3 (30)
R13: *Inc, SC in next 9 st* rep x 3 (33)
R14: *Inc, SC in next 10 st* rep x 3 (36)


Change working yarn color to the darker brown


R15: *Inc, SC in next 11 st* rep x 3 (39)


Place safety eyes and snap washer backs into place.  Embroider nose at the tip of the cone using black embroidery thread.


R16: *Inc, SC in next 12 st* rep x 3 (42)
R17: *Inc, SC in next 13 st* rep x 3 (45)
R18: *Inc, Sc in next 14 st* rep x 3 (48)
R19 through R24: SC in each st around (48)
R25: *Dec, SC in next 6 st* rep x 6 (42)
R26: *Dec, SC in next 5 st* rep x 6 (36)
R27: *Dec, SC in next 4 st* rep x 6 (30)
R28: *Dec, SC in next 3 st* rep x 6 (24)


Start stuffing body


R29: SC in each st around (24)
R30: *Dec, SC in next 2 st* rep x 6 (18)
R31: SC in each st around (18)
R32: *Dec, SC in next st* rep x 6 (12)
R33: Dec in each st around (6)


Sew the hole closed and hide the yarn tail in the body.


Ear Pattern (Make 2)


Begin with light brown yarn, use size E hook.


Begin with 6 SC in Magic Circle
R1: Inc in each SC (12)
Finish off to complete first half of ear


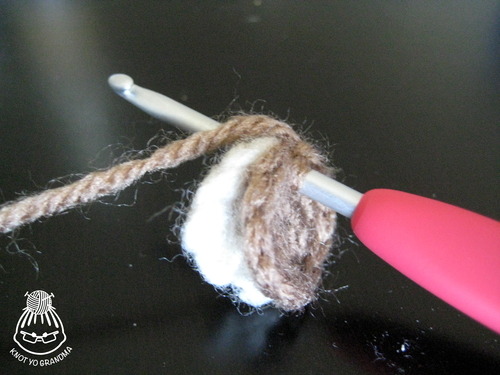
Repeat above instructions using dark brown yarn, but do not finish off.  Once both halves are completed, match the light brown and dark brown pieces together with right sides facing out.  Hide any yarn tails between the two pieces.  Once the two halves are matched, SC through BOTH layers in each st around with the dark brown yarn.  Finish off and leave a long tail.  Pinch the bottom of the ear together and sew a few stitches using the tail to keep the bottom pinched.  Sew the ears onto the body using the rest of the tail.


Feet (Make 4)


Use light brown yarn and E hook.
Begin with 6 SC in Magic Circle
R1: Inc in each SC (12)
R2: SC BLO in each st (12)


Fasten off and leave a long tail for sewing.


Pin the feet to the bottom of the body.  Make sure the hedgehog can stand upright while the feet are pinned, and then sew the feet to the body.


Since the instructions for the ears are a little confusing, below is a picture of how the two halves should be put together and both layers should be stitched through:


image


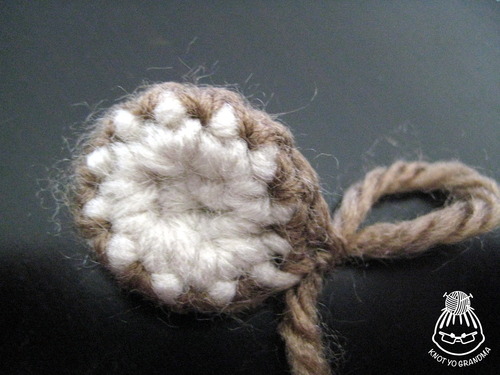
It should look like this after the final round of single crochet:


image


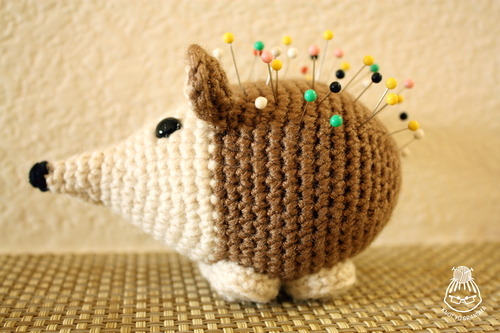
That’s it, your hedgehog is done!


image


image


Now have fun stabbing him.