


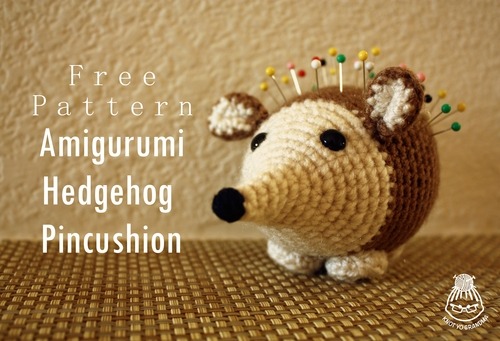
Never again suffer the indignity of a jab in the hindquarters from a wayward pin!
Materials
Acrylic worsted weight yarn in two shades of brown (one light, one dark)
Size F crochet hook
Size E crochet hook
2 9mm safety eyes
Yarn needle
Black embroidery thread
Embroidery needle
Poly-Fil stuffing (or equivalent)
Things to Know
This is an original pattern by Robyn of Knot Yo Grandma. It has been provided at no charge and cannot be sold or redistributed. Please do not claim this pattern as your own. When referencing this pattern, please link back to this post.
This pattern is worked entirely in the round with single crochet stitches using increases and decreases. Do not join rounds—continue working in a spiral. Use a stitch marker to mark the last stitch of each row. The number in parenthesis at the end of each line in the pattern represents the number of completed stitches in each round.
CH= Chain
SC= US Single Crochet (UK Double Crochet)
SC BLO= Single Crochet in back loops only
Inc=Increase (2 stitches in 1 stitch)
Dec=Decrease
st= Stitch(es)
rep= follow instructions within *stars* this many times in a single round
Body Pattern
Begin with light brown yarn, use size F hook.
Begin with 3 SC into Magic Circle (3)
R1: Inc in next SC, SC in next 2 SC (4)
R2: *Inc, SC in next st* rep x 2 (6)
R3: *Inc, SC in next st* rep x 3 (9)
R4: SC in each st around (9)
R5: SC in each st around (9)
R6: *Inc, SC in next 2 st* rep x 3 (12)
R7: *Inc, SC in next 3 st* rep x 3 (15)
R8: *Inc, SC in next 4 st* rep x 3 (18)
R9: *Inc, SC in next 5 st* rep x 3 (21)
R10: *Inc, SC in next 6 st* rep x 3 (24)
R11: *Inc, SC in next 7 st* rep x 3 (27)
R12: *Inc, SC in next 8 st* rep x 3 (30)
R13: *Inc, SC in next 9 st* rep x 3 (33)
R14: *Inc, SC in next 10 st* rep x 3 (36)
Change working yarn color to the darker brown
R15: *Inc, SC in next 11 st* rep x 3 (39)
Place safety eyes and snap washer backs into place. Embroider nose at the tip of the cone using black embroidery thread.
R16: *Inc, SC in next 12 st* rep x 3 (42)
R17: *Inc, SC in next 13 st* rep x 3 (45)
R18: *Inc, Sc in next 14 st* rep x 3 (48)
R19 through R24: SC in each st around (48)
R25: *Dec, SC in next 6 st* rep x 6 (42)
R26: *Dec, SC in next 5 st* rep x 6 (36)
R27: *Dec, SC in next 4 st* rep x 6 (30)
R28: *Dec, SC in next 3 st* rep x 6 (24)
Start stuffing body
R29: SC in each st around (24)
R30: *Dec, SC in next 2 st* rep x 6 (18)
R31: SC in each st around (18)
R32: *Dec, SC in next st* rep x 6 (12)
R33: Dec in each st around (6)
Sew the hole closed and hide the yarn tail in the body.
Ear Pattern (Make 2)
Begin with light brown yarn, use size E hook.
Begin with 6 SC in Magic Circle
R1: Inc in each SC (12)
Finish off to complete first half of ear
Repeat above instructions using dark brown yarn, but do not finish off. Once both halves are completed, match the light brown and dark brown pieces together with right sides facing out. Hide any yarn tails between the two pieces. Once the two halves are matched, SC through BOTH layers in each st around with the dark brown yarn. Finish off and leave a long tail. Pinch the bottom of the ear together and sew a few stitches using the tail to keep the bottom pinched. Sew the ears onto the body using the rest of the tail.
Feet (Make 4)
Use light brown yarn and E hook.
Begin with 6 SC in Magic Circle
R1: Inc in each SC (12)
R2: SC BLO in each st (12)
Fasten off and leave a long tail for sewing.
Pin the feet to the bottom of the body. Make sure the hedgehog can stand upright while the feet are pinned, and then sew the feet to the body.
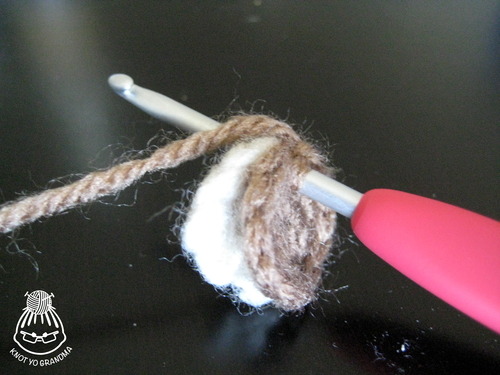
Since the instructions for the ears are a little confusing, below is a picture of how the two halves should be put together and both layers should be stitched through:
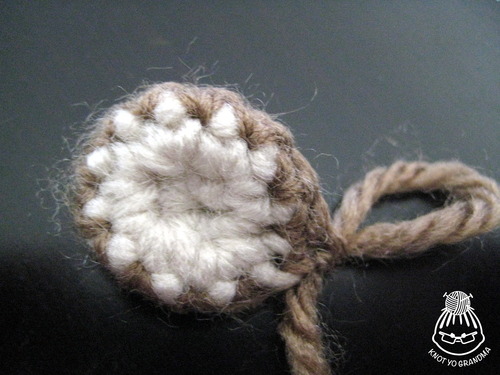
It should look like this after the final round of single crochet:
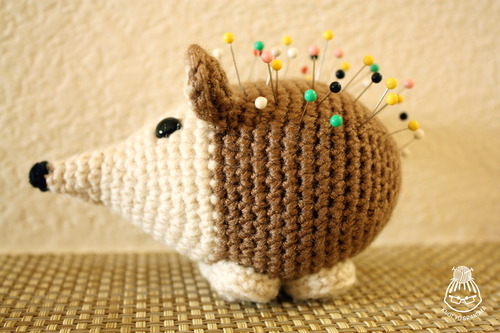
That’s it, your hedgehog is done!
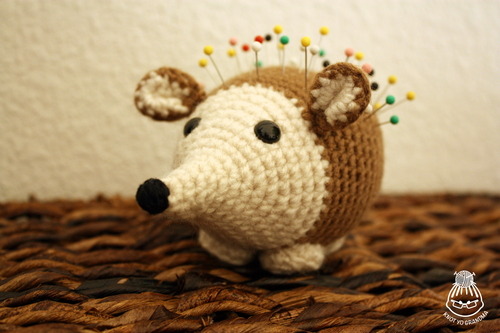
Now have fun stabbing him.
il est trop mignon !
ReplyDeleteSehr schön und lieb Danke für die Anleitung
ReplyDeleteAppreciate you blogging thhis
ReplyDelete